Toilets have simple mechanisms such as a P-trap and venting mechanism. This setup ensures that the toilet works properly, prevents sewer gas from entering the house, and doesn’t become clogged over time.
The ventilation system of your toilet is based on liquids and gases’ weight and response to the action. Because wastes and liquids are heavier than gases, they generally take up the bottom portions of the pipes, while the gases take up the top portions. To allow for a balance of pressure between them, vents are utilized to enable the wastewater to flow to the drain.
Why does a Toilet Need a Vent?
A vent pipe system is used to ensure that air can travel into the wastewater drainage pipes in case of blockage or excess water. If a ventilation system isn’t present, gases produced by wastewater will be trapped inside your toilet. These gases are poisonous, and over time they can cause potential health risks such as respiratory diseases and carbon monoxide poisoning.
When blocked, the toilet can overflow into the bathroom. This will make a huge mess and possibly ruin your floors and other surfaces in the bathroom.
Toilet Venting Steps
Before you try to do any kind of venting, ensure that the power is off. You don’t want to get scalded in case you get shocked by a recent fixture or appliance installation. Second, drain water from the tank and bowl. Now take apart the toilet and place it in front of your work area. Remove as many parts as you can, such as the tank cover, cistern or ballcocks.
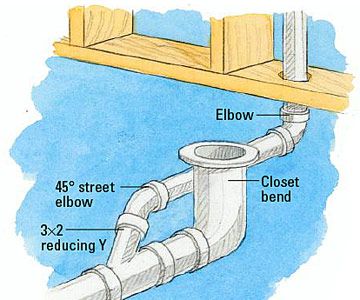
Bathroom Venting Step by Step Guide
1.Connect the Vent
Unless your home already has a vent that runs through your roof and connects to an existing stack, then you’ll need to install one. Stack systems are commonly used and connect a series of vent pipes in a vertical manner that ends at the roof.
You can buy PVC vents from home improvement stores fairly cheaply. Ensure that your measurements are accurate and you purchase the right sized piping to work with your existing drain system. If you need help deciding which vents will suit your needs, go online for suggestions or contact a professional plumber.
2. Drill a Hole in the Floor
Ensure that you choose a position to drill through the floor that’s close enough to your stack venting system to attach them together later on. You should also try to avoid any obstructions such as water pipes and heating vents when choosing where to drill. Once you’ve decided on a space, drill a hole and fit a grommet to keep out any foul odors.
3. Clear Obstructions
There may be obstructions such as water or gas pipes in your way which need to be removed before venting can take place. You might also need to set up new plumbing for the drain system. In case there’s an obstruction, contact a professional plumber who can free up your pipes and ensure that you have enough space to drill.
4. Move the Toilet Back in Place
Place the toilet back into position, reattach any removed parts and make sure everything is hooked up correctly. If you need help with this step, ask a friend or family member or contact a plumber to complete the task.
5. Caulk Around the Toilet
Use a caulking gun and some plumbers caulk around the base of your toilet, then let it dry completely before using the bathroom again. In case there are any holes or cracks in your current plastic water lines; you’ll need to remove them and replace them with new ones.
6. Test the Vent System
Ensure that you test out your vent system by pouring water into the bowl but don’t flush it! If it doesn’t drain then there’s a problem with the installation somewhere, or possibly an obstruction in your pipes so hire a professional to help. You might also notice the toilet rocking back and forth once there’s water in the tank – this is normal.
7. Make the Final Connections
Now that you’ve tested out your new vent system, make any final connections to ensure that everything is working as it should. You might need to install a pipe or two for the final section of drainage before the wastewater goes into the main stack system.
8. Flush and Clean up
Once everything is connected, flush your toilet to test it out again. Once you’ve finished using your bathroom, clean all of the caulk off around the base of the toilet and in any other areas where it’s visible to ensure there are no leakages or cracks which can cause damage to your flooring.
Toilet venting options Without a Vent
If your house does not have a venting pipe or is broken and cannot be fixed, your toilet may still function effectively. The answer is in the use of Air Admittance Valves, also known as cheater vents, which vent the toilet without the need for any of the structures necessary in conventional plumbing vents.
The use of air admittance valves to vent toilets is a touchy subject, and you should check to see whether it is legal in your area before utilizing one. However, we’ve discovered that many of these devices are in use across the country, so the risk of them being illegal in your region is minor.
FAQs
What is the ideal Toilet vent distance?
The minimum distance between the toilet and combustible materials is 6 feet, according to the UPC standards.
Are there self-venting toilets?
Yes, self-venting toilets are available. Although this is technically required by law, self-venting toilets do exist.
Can a clogged vent cause a toilet to overflow?
Yes. A clogged vent may cause an imbalance in the toilet’s pressure, resulting in an overflow.
Can a toilet shower and sink share a vent?
Yes. Through wet venting, a toilet shower and sink can share a vent.

A group of home improvement enthusiasts and bathroom design experts, combines in-depth knowledge and a shared passion to deliver engaging, informative content that guides readers through the world of bathroom innovation and style.
Leave a Reply