Introduction:
Maintaining the correct water level in your toilet bowl is not only crucial for optimal performance but also plays a significant role in water conservation. An incorrect water level can lead to various issues, including inefficient flushing, potential water waste, and even plumbing problems. This comprehensive guide aims to empower you with the knowledge and step-by-step instructions to adjust the water level in your toilet bowl effectively, ensuring smooth operation and environmental responsibility.
I. Why Adjusting Water Level Matters:
A. Efficient Flushing and Water Conservation
1. Proper water levels enable efficient flushing, preventing clogs and ensuring waste removal.
2. Adjusting the water level helps in conserving water, contributing to sustainability and lower utility bills.
B. Prevention of Potential Plumbing Issues
1. Incorrect water levels can strain the toilet’s internal components, leading to wear and tear.
2. Regular adjustments mitigate the risk of more significant plumbing problems, saving you from costly repairs.
C. Improved Overall Toilet Performance
1. Optimal water levels contribute to a quieter and more effective flush.
2. Maintaining the right water level enhances the lifespan of toilet components.
II. Preliminary Checks:
A. Flush the Toilet and Observe the Water Level
1. Note the water level after flushing to determine if adjustments are needed.
B. Inspect the Water Supply Valve for Leaks
1. Check for any visible leaks around the water supply valve.
C. Check the Float Mechanism for Proper Functioning
1. Ensure the float rises and falls appropriately during and after flushing.
III. Tools and Materials:
A. Gather Necessary Tools
1. Adjustable wrench for nuts and bolts
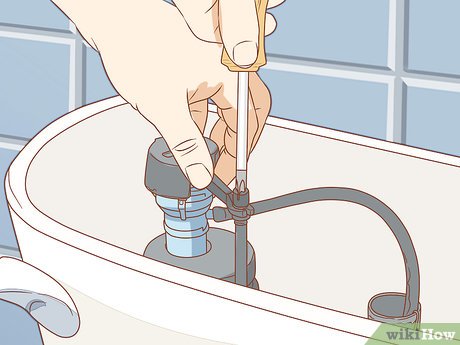
2. Screwdriver for specific adjustments
3. Measuring tape for accuracy
4. Replacement parts (if required)
IV. Adjusting Water Level Using the Float Mechanism:
A. Identify the Float Adjustment Screw or Rod
1. Locate the float adjustment mechanism, usually connected to the fill valve.
B. Turn the Adjustment Screw to Raise or Lower the Float
1. Clockwise turns generally lower the water level, while counterclockwise raises it.
C. Test the Water Level by Flushing the Toilet
1. Flush the toilet to assess the impact of the adjustment.
D. Repeat Adjustments Until the Desired Water Level is Achieved
1. Fine-tune until the water level aligns with the marked indicator.
V. Adjusting Water Level Using the Water Fill Valve:
A. Locate the Adjustment Screw or Knob on the Water Fill Valve
1. Identify the adjustment mechanism usually located on top of the fill valve.
B. Turn the Screw or Knob to Adjust the Water Level
1. Clockwise turns often decrease water levels, while counterclockwise increases them.
C. Flush the Toilet to Check the New Water Level
1. Ensure the adjustment meets the desired water level.
D. Fine-Tune the Adjustment If Necessary
1. Repeat the process until the ideal water level is achieved.
VI. Checking for Leaks:
A. Inspect the Toilet Bowl and Tank for Visible Leaks
1. Look for any water around the base or sides of the toilet.
B. Tighten Any Loose Connections
1. Use an adjustable wrench to tighten loose nuts and bolts.
C. Replace Damaged or Worn-Out Parts If Needed
1. Address any issues with components like the fill valve or flapper.
VII. Verifying Proper Flush:
A. Ensure the Toilet Flushes Efficiently After Adjustments
1. Confirm that the flushing action is swift and thorough.
B. Check for Unusual Sounds or Issues During Flushing
1. Listen for any unusual noises or delays in the flushing process.
C. Confirm That the Water Level Remains Stable Post-Flush
1. Monitor the water level to ensure it stays consistent.
VIII. Final Checks:
A. Tighten Loose Nuts or Bolts on the Toilet Tank
1. Use an adjustable wrench to secure all connections.
B. Clean the Toilet Bowl and Tank as Necessary
1. Remove any mineral deposits or debris that might affect performance.
C. Monitor the Toilet for a Few Days to Ensure Water Level Consistency
1. Confirm that adjustments hold over time.
IX. Troubleshooting:
A. Addressing Persisting Issues After Adjustment
1. Double-check adjustments and inspect for potential hidden issues.
B. Considering Professional Assistance If Needed
1. Consult with a plumber if problems persist or if you are uncomfortable making adjustments.
C. Reviewing the Toilet’s User Manual for Specific Guidance
1. Manufacturers may provide specific instructions tailored to your toilet model.
FAQs:
Q1: How often should I adjust the water level in my toilet?
A: It’s recommended to check and adjust the water level every few months or if you notice any issues with flushing.
Q2: Why is a proper water level important?
A: Maintaining the correct water level ensures efficient flushing, prevents water waste, and helps avoid potential plumbing problems.
Q3: Can I use any tools to adjust the water level, or are specific tools required?
A: Basic tools like an adjustable wrench and screwdriver are usually sufficient. Specific tools may vary depending on your toilet model.
Q4: What should I do if I still experience issues after adjusting the water level?
A: If problems persist, consider seeking professional assistance to identify and address any underlying plumbing issues.
X. Conclusion:
Regularly adjusting the water level in your toilet is a simple yet vital task that contributes to the efficient and sustainable operation of your bathroom fixture. By following these detailed step-by-step instructions and incorporating routine checks into your maintenance routine, you not only ensure optimal toilet performance but also contribute to water conservation and the longevity of your plumbing system.

A group of home improvement enthusiasts and bathroom design experts, combines in-depth knowledge and a shared passion to deliver engaging, informative content that guides readers through the world of bathroom innovation and style.
Leave a Reply