In the realm of DIY plumbing projects, installing a bathtub drain and trap ranks among the more accessible endeavors. This step-by-step guide is designed to demystify the process, empowering you to successfully replace an old drain or install a new one. With the right tools and a systematic approach, you’ll achieve a watertight seal and efficient drainage for your bathtub. Let’s embark on this plumbing adventure together.
Preparation:
Initiating any plumbing project demands a cautious start. Begin by turning off the water supply to the bathroom to avoid unexpected water surprises.
Ensure the bathtub area is free of obstructions and put on the essential safety gear, including gloves and safety glasses.
Remove Old Drain:
The initial step involves bidding farewell to the old drain. Utilize a plunger to clear any residual water and then proceed to remove the drain cover. Employ a pipe wrench to loosen the drain flange, and with the help of a screwdriver or pliers, detach the old drain.
Thoroughly clean the area around the drain hole to prepare it for the new installation.
3. Clean and Inspect:
With the old drain out of the picture, take the time to inspect the drainpipe for any signs of damage or debris.
Ensure the drain hole is spotless, removing any remnants of old putty or sealing material that may hinder the effectiveness of the new installation.
4. Apply Plumber’s Putty or Silicone:
To create a robust and waterproof seal, roll plumber’s putty into a rope and carefully apply it around the underside of the new drain flange. Insert the new drain into the hole and use a pipe wrench to tighten the flange securely.
Alternatively, if you prefer, you can use silicone sealant as a reliable substitute—just be sure to follow the manufacturer’s guidelines.
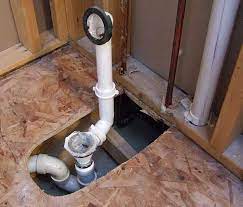
5. Install the Tub Trap:
The trap assembly plays a crucial role in ensuring optimal drainage. Connect it to the drainpipe, paying close attention to its correct positioning. Use an adjustable wrench to tighten the connections, guaranteeing a leak-free joint that will withstand the test of time.
6. Connect to Existing Plumbing:
Depending on your setup, you may need to cut the drainpipe to the required length using a hacksaw. Apply plumber’s tape to the threaded connections and use an adjustable wrench to connect the new drain and trap to the existing plumbing. This step requires precision to avoid leaks.
7. Check for Leaks:
With the installation in place, it’s time to turn on the water supply, fill the bathtub, and inspect for any leaks. Should you detect leaks, promptly tighten the connections as needed.
A vigilant approach at this stage is essential for preventing potential water damage.
8. Seal Around Drain:
Enhance the waterproofing of your installation by applying a bead of silicone sealant around the edge of the drain flange. This extra layer of protection provides added assurance of a secure and long-lasting installation.
9. Test Drainage:
To ensure the success of your efforts, test the bathtub drainage by allowing water to drain completely. Keep a watchful eye for any unusual noises or signs of slow drainage, as these could signal potential issues that require attention.
10. Clean Up:
Conclude the installation by tidying up the work area and disposing of any old materials responsibly. Leave the space as you found it, now equipped with a freshly installed and reliable bathtub drain and trap.
FAQs:
Q1: Can I use silicone instead of plumber’s putty?
A1: Yes, silicone sealant is a suitable alternative to plumber’s putty. Ensure you follow the manufacturer’s recommendations for proper application and curing.
Q2: Do I need a plumber for this installation?
A2: While this project is DIY-friendly, if you encounter uncertainty or discomfort with any step, consider consulting a professional plumber for assistance to ensure a flawless installation.
Q3: How often should I check for leaks after installation?
A3: It’s advisable to check for leaks immediately after installation and periodically thereafter. Regular checks become particularly important if you observe any changes in water drainage or suspect a potential issue.
Conclusion:
Embarking on the journey of installing a bathtub drain and trap can be a rewarding and educational experience. By diligently following this comprehensive guide, you not only save money but also gain valuable plumbing skills. Should the need arise, don’t hesitate to seek professional assistance, ensuring you enjoy a newfound confidence in the reliability and efficiency of your bathtub drainage system. Revel in the success of your DIY plumbing endeavor!

A group of home improvement enthusiasts and bathroom design experts, combines in-depth knowledge and a shared passion to deliver engaging, informative content that guides readers through the world of bathroom innovation and style.
Leave a Reply