Unclogging a Shower Drain:
Showering should be a refreshing experience, but when water starts pooling around your ankles due to a clogged drain, it can turn into a less-than-pleasant ordeal. Thankfully, with a bit of DIY effort and the right tools, you can easily tackle this common household issue. In this comprehensive guide, we will take you through the step-by-step process of snaking a shower drain, addressing everything from the necessary tools to frequently asked questions.
1. Gather Supplies:
The first step in any DIY project is ensuring you have all the necessary tools. For snaking a shower drain, you’ll need a few key items: a drain snake or auger, a plunger, a bucket, towels or rags, gloves for protection, and, depending on your plumbing setup, a pipe wrench and screwdriver.
2. Preparation:
Before you begin, don your gloves to protect your hands and place towels or rags strategically around the shower to catch any water. If applicable, remove the shower drain cover to access the drain more easily.
3. Try a Plunger:
The plunger is often the first line of defense against a clogged drain. Seal it over the drain and pump it up and down several times to dislodge any surface-level clogs. This simple yet effective method can clear minor obstructions.
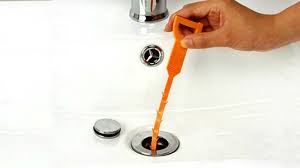
4. Insert the Drain Snake:
If the plunger doesn’t do the trick, it’s time to bring in the heavy artillery – the drain snake. Extend the snake fully and insert it into the drain. Turn the handle clockwise while gently pushing the snake into the drain, allowing it to navigate through the pipes and dislodge stubborn clogs.
5. Feel for Obstructions:
As you snake the drain, rotate it while pushing forward. This helps break up or hook onto clogs, allowing the snake to grab hold and pull them out. Be cautious and gentle to avoid causing damage to the pipes.
6. Retrieve the Snake:
When you encounter resistance, it means the snake has reached the source of the clog. Rotate the snake in the opposite direction and slowly pull it out, bringing the accumulated debris with it. Take care not to yank it out forcefully to prevent potential damage to the pipes.
7. Repeat if Necessary:
For persistent clogs, repeat the process until water flows freely. It may take a few attempts to completely clear the drain, especially if the clog is particularly stubborn.
8. Flush the Drain:
After successfully snaking the drain, run hot water through it to flush out any remaining debris. This helps ensure that your efforts have effectively cleared the entire plumbing system.
9. Replace the Drain Cover:
Before concluding your DIY plumbing project, clean the drain cover if necessary, and securely place it back over the drain.
10. Clean Up:
Dispose of any debris properly and take the time to clean the drain snake and other tools used during the process. Proper cleanup ensures that your tools remain in good condition for future use.
11. Inspect for Further Issues:
If, despite your efforts, the drain continues to exhibit slow drainage or other issues, it’s advisable to seek professional help. There may be underlying problems that require the expertise of a plumber to avoid potential damage to your plumbing system.
FAQs:
Q1: Can I use a chemical drain cleaner instead of a snake?
A: Chemical drain cleaners can be harsh and may damage pipes. It’s often safer to use a snake or auger for effective and less abrasive unclogging.
Q2: How often should I snake my shower drain?
A: Aim for preventive maintenance every few months to prevent the buildup of hair and debris. If you notice slow drainage, it’s time for a more immediate intervention.
Q3: Can I use the same snake for different drains?
A: It’s best to have a separate snake for each type of drain to prevent cross-contamination of bacteria and debris.
Q4: What should I do if I encounter strong resistance while snaking?
A: If you encounter significant resistance, stop immediately. Excessive force can damage pipes. Consult a professional plumber for assistance.
Conclusion:
Maintaining a clog-free shower drain is a relatively simple task with the right tools and a bit of DIY know-how. Regular preventative measures and prompt action when issues arise can help ensure your showers remain enjoyable and stress-free. By following this comprehensive guide and the provided tips, you can confidently address shower drain clogs and keep your plumbing system running smoothly. If problems persist, don’t hesitate to call in a professional to avoid potential damage and ensure the longevity of your plumbing infrastructure.

A group of home improvement enthusiasts and bathroom design experts, combines in-depth knowledge and a shared passion to deliver engaging, informative content that guides readers through the world of bathroom innovation and style.
Leave a Reply