Introduction:
A smoothly functioning toilet is a cornerstone of household comfort, and the water level in the bowl plays a critical role in achieving this. If you’ve been experiencing weak flushes, incomplete waste removal, or strange gurgling sounds, it may be time to inspect and adjust the water level in your toilet bowl. In this detailed guide, we will walk you through the steps to raise the water level effectively, ensuring your toilet operates at its best.
I. Importance of Proper Water Level:
Maintaining the correct water level in your toilet bowl is more than just a matter of convenience; it directly impacts the toilet’s flushing efficiency.
An inadequate water level can lead to weak flushes, increased risk of clogs, and incomplete waste removal, causing frustration and potential hygiene issues.
II. Inspection:
Begin the process by lifting the tank lid and locating the water level mark inside. This mark indicates the recommended water level for optimal performance.
With the aid of a flashlight, inspect the water level in the bowl, paying attention to its relation to the trapway.
Understanding this relationship is crucial for identifying potential issues.
III. Adjusting the Water Level:
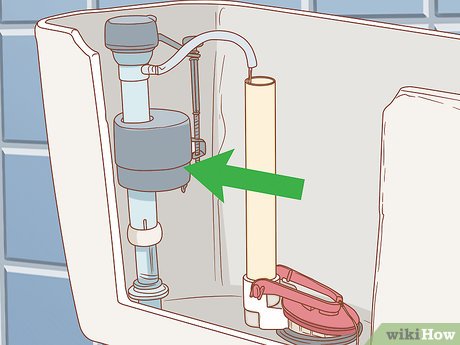
Identify the Fill Valve:
- Locate the fill valve, typically found at the bottom of the tank or connected to the float mechanism.
Locate the Adjustment Screw or Knob:
- The fill valve will have an adjustment screw or knob. Find this mechanism; it’s the key to adjusting the water level.
- Adjust the Water Level:
- Turn the adjustment screw or knob clockwise to raise the water level.
- Conversely, turn it counterclockwise to lower the water level.
- Test the Adjusted Water Level:
- Flush the toilet to ensure that the adjusted water level provides an efficient and complete flush.
- Repeat adjustments if necessary until the desired water level is achieved.
IV. Checking for Leaks:
Inspect the tank and bowl for any visible leaks. Additionally, perform a dye test by adding a few drops of food coloring or a dye tablet to the tank. Wait a few minutes and check the bowl for colored water. Address any leaks promptly to prevent water wastage and potential damage.
V. Additional Tips:
- Clean Tank Components:
- Remove any debris or sediment from tank components, such as the flapper and fill valve, to ensure smooth operation.
- Consider Part Replacement:
- If your toilet components are worn out, consider replacing them. The flapper or fill valve may be contributing to water level issues.
- Consult a Professional:
- If, despite your efforts, issues persist, it may be time to consult a professional plumber. They can identify and address underlying problems that might be affecting your toilet’s performance.
FAQs:
Q1: Can I use any dye for the dye test?
- A: Yes, common household items like food coloring work well for the dye test. The goal is to identify any potential leaks.
Q2: How often should I check and adjust the water level?
- A: Periodically check the water level, especially if you notice any issues. Adjust as needed, and consider more frequent checks if problems persist.
Q3: Why is a proper water level important?
- A: A proper water level ensures effective flushing, preventing clogs and maintaining water efficiency, contributing to both functionality and environmental responsibility.
Q4: What if adjusting the water level doesn’t solve the problem?
- A: If issues persist, it’s advisable to consult a plumber. Professional expertise can help identify and address any underlying problems affecting your toilet’s performance.
Conclusion:
In conclusion, the water level in your toilet bowl is a crucial factor in ensuring optimal functionality. By following the comprehensive steps outlined above and integrating regular checks into your home maintenance routine, you can enjoy an efficient, trouble-free toilet. Don’t underestimate the importance of proper water levels for both your convenience and environmental responsibility.

A group of home improvement enthusiasts and bathroom design experts, combines in-depth knowledge and a shared passion to deliver engaging, informative content that guides readers through the world of bathroom innovation and style.
Leave a Reply