Tiling a bathroom may appear to be an intimidating task, but with the right know-how, you can do it yourself.
There are many options for tiling a bathroom, and they all have unique tools and rules. The floor and walls of a bathroom are two separate topics to consider when tiling. BathroomInspector will cover tiling your bathroom floor in this article.

We’ll walk you through the process of cutting and tiling, as well as discuss the tools you’ll need. So, whether you’re a novice when it comes to tile or if you’ve done it before but want a refresher, we’re here to help.
Continue reading to learn how to tile your bathroom floor and the equipment you’ll need for the job…
How to remove bathroom tiles
The procedure for removing your bathroom floor tiles is quite easy, and it necessitates only a few instruments.
You’ll need a chisel and hammer, as well as gloves and goggles to protect yourself. To keep tiles from flying or falling and damaging your appliances, wrap sheeting around the room. If at all possible, enlist the help of a friend or family member to remove them for you.
Process of removing a tile
The first tile is always the most difficult to remove – getting the chisel underneath it isn’t always straightforward. Check for a loose tile right away.
If you discover a loose tile, remove it with the chisel. If you can’t find a loose tile, you’ll have to smash one. Hit the chisel with the hammer in the center of the tile to shatter it and allow it to be removed.
Removing floor tiles

You should be able to reach the rest of the tiles after you’ve removed the first. The chisel should be placed against the surface with the chisel point tucked behind the tile. Tap it with a hammer, then push it away from you slowly. This will cause the tile to pop off of its surface.
When all of the tiles have been removed, clean any remaining adhesive from the surface with the chisel and hammer. This will come in handy when laying your new ones since you’ll need a flat surface.
Place any trash in the bin and vacuum the floor. Wipe down the floor to remove any dust that may have fallen during cleaning.
Why should I buy bathroom tiles?
Bathroom tiles have long been popular in bathrooms for a variety of reasons, the most important two being that they are simple to clean and last a long time.
Tiles are typically water-repellent and require little maintenance once they’re in place. Dirt or grime may be removed, and, aside from applying the new sealant on occasion, you won’t have to worry about floors for a long time.
Tiled bathroom
Because of their low cost, tiling is one of the most cost-effective methods for remodeling your property. Tiles’ ease of installation and low maintenance requirements make them an ideal option for replacing worn or damaged tiles while still providing a clean look to your space. When installed correctly with the correct amount of grout and sealant, tiles will provide a waterproof flooring surface.
Preparations
Before you buy anything, you must first plan and prepare for tiling your bathroom, particularly the space you wish to tile and the design.
If you’re remodeling your bathroom, you’ll already know exactly how much space you’ll need, but when it comes to full or half-tiled tiles, there are certain advantages and drawbacks. Fully tiling a bathroom allows for greater appliance options than partially tiling it, although partial tiling restricts where a bathtub, sink, or shower can go, as well as the size of each.
How many tiles will I need to finish my project?
For this method, simply divide the surface area by the number of squares per meter in your bathroom. Then, add 15% to allow for cut pieces so you aren’t caught short and have to order more later in the process.
Tiling the bathroom floor

The following calculation may be of help:
(Length of floor ÷ length of individual tile) x (width of floor ÷ width of individual tile)
Always round up if your result has a decimal point.
What is the minimum amount of materials that I’ll need to tile a bathroom?
The following are the equipment and materials you’ll need to tile the bathroom floor:
Materials
- Tile adhesive
- Sealant
- Grout
Tools
- Tape measure
- Pencil
- Adhesive trowel
- Notched trowel
- Tile spacers
- Spirit level
- Tile cutter
- Sealant gun
- Protective goggles and gloves
- Grout spreader
- Tile nipper
- Rubber mallet
How to tile a bathroom floor is explained here.
If you’re tiling both the floor and the walls, you should always begin with the wall. This protects your floor tiles from damage if anything goes wrong.
Placing wall tile
You should be able to tile your floor with ease if you follow our step-by-step instructions.
Starting position
Measure the breadth of your floor space with a measuring tape and then make a pencil mark at the center point. Then, starting from this location, work your way towards one of your walls, installing tile spacers between each tile. This will provide you an estimate of how many tiles you’ll need.
Always work from the center out to the corners while tiling your floor.
Apply adhesive
1m2 is the surface area of a 1-meter square. Place the tile adhesive with an adhesive trowel on the floor, then use a notched trowel to spread this over a 1 m² surface. Spread the glue using the smooth side of the trowel first, and then go back over it with the serrated edge to ensure a strong bond between your tiles and the floor.
Adhesive for tiles

Before you apply the adhesive, be sure it can be applied to your bathroom surface.
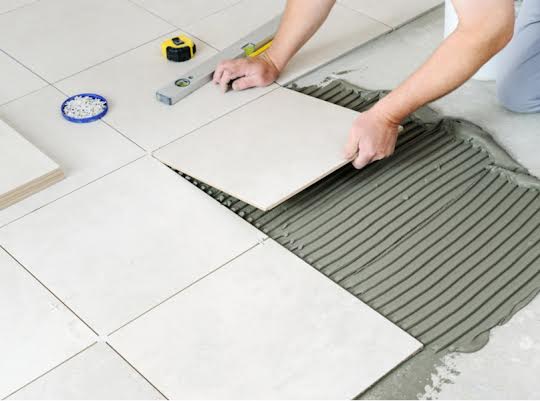
Place your tiles

Start by laying your first tile down and pressing it firmly into place with a twisting motion. Repeat the procedure with the next tile, using the tile spacers in between. They can be flat or upright. If they are flat, press them below the surface of the tile to ensure that they’re concealed when you apply the grout later.
Check the tiles are level
Place your tiles in a random pattern to create an interesting appearance on the walls, floor, or any other flat surface. Place one tile at a time and keep checking for levelness with a spirit level every now and then. If they aren’t level, lightly tap them with a rubber mallet until they are. Place a little length of wood or cardboard under the tiles to cushion them and prevent excess noise.
Levelling floor tiles

It is better to remove the glue as soon after it has set as possible because it becomes more difficult to remove once dry.
If there is a space between the final full tile and the bathroom wall, you’ll need to cut it out…
How to measure and cut bathroom tiles
The tiles that border the floor will almost certainly need to be sliced down.
Before you lay your tiles, make sure they will have to be cut and use a tile cutter to cut them. Because floor tiles are sturdier and heavier than wall tiles, a flatbed cutter is preferable. For protection against flying sharp shards and debris, wear gloves and goggles when performing this operation.
This is especially useful in the ‘Starting Position’ section, where lining your tiles up from the middle out to the wall as they would appear once put in place helps to indicate where a cut tile will go and how much you’ll need to cut it.
Pre-trowel the tiles before cutting them.
To avoid water seeping between the tiles, carefully mark the floor beneath. If you’re not sure where to start grouting, think about your location’s heating and cooling requirements. Make sure to allow space for grout and tile spacers if you want a clean join between pieces of different sizes. You may smooth any rough edges with a tile file before the adhesive dries.
– To lift larger pieces without breaking smaller ones, use a large knife to carefully prod underneath the tiles. All remaining adhesive and fragments should be swept up immediately.
Fix the tile to the surface using wall adhesive.
A tile scriber is another option for cutting tiles. Place a metal ruler against the mark and score the line with the scriber several times, then place your pencil under the line so that the end you want to remove is raised. To split the tile, firmly press on it.
Cutting tiles around gas appliances
Tile cutting is different, and it’s not unusual to cut curves in tile. You’ll need to cut bends in your tiles since this involves anything from toilets to baths. This necessitates the usage of curves in your tiles.
You’ll need a tile scribe and a tile nipper, such as a clipper or plier, to accomplish this.
Start by obtaining a piece of paper that is the same size or has the same dimensions as one of your tiles. Make a frilled fan out of the paper by cutting lines or slits in it.
Place it in the sink like a tile, with a gap for your tile spacers and pressing down on the paper while folding back the slits where they meet the appliance. Draw a line as shown using a pen or pencil.
Tile cutter
The first line is the template for where you’ll need to cut; it’s similar to a marked line for cutting on a piece of paper. To make a cut line on your tile, tape the paper to the tile you wish to cut and use a pencil to mark it.
To get a straight line, score the full line multiple times with your tile scribe. Start clipping small portions of tile away using the nipper. When you approach the line, take care. Using a tile file or sandpaper, smooth the edge and remove any dust with a clean cloth if necessary.
Apply the adhesive to your tile and then set it in position.
Grouting bathroom floor tiles
When your tiles have been set and hardened – this can take up to 48 hours – you may begin grouting between them.
Remove upright tile spacers once your tiles are in position and level. You don’t want them to get trapped in the adhesive after you’ve done it.
Grout floor tiles
Grout may be white, black, or off-white. It’s available in a variety of colors to blend in with your tiles and create a smooth transition between them.
Give your tiles a clean by dusting them off and removing any debris.
If you’ve pre-mixed the grout, fantastic. Otherwise, combine it in a pail. To work the mix into the tile joints, use a grout float or a spreader. You must do so rapidly. Remember to move the float diagonally across gaps between tiles to fill them.
Use enough grout to fill the gaps, making sure the grout is level with the tile’s surface for a totally smooth floor. A grout finisher may be used to compact the grout and ensure it is level with the surface of the tile.
If you used flat tile spacers, such as those that are placed between the tiles to keep them in place, make sure they’re grouted.
Wipe down tiles and remove excess grout
Use a moist sponge or towel to wipe any leftover grout away from the tile surface before it solidifies – thus do it whilst you grout, not after.
Allow the grout to dry, as directed on your product’s instructions – and make sure no one uses the bathroom until it’s fully dry.
Seal your tiles
Finally, you’ll need to apply sealant between the tiles and the bathroom walls, as well as any appliances.
Applying sealant
Tile sealer will keep water from seeping through the walls or appliances and preventing any from getting beneath the tiles via the walls or appliances. With a constant bead of sealant, work your way from one end of the bathroom to the other. Use a sealant or caulking gun for optimum pressure and speed. After that, wait 24 hours for the sealant to dry.

A group of home improvement enthusiasts and bathroom design experts, combines in-depth knowledge and a shared passion to deliver engaging, informative content that guides readers through the world of bathroom innovation and style.
Leave a Reply